Printing
Printer Page Layout
The Printer Page Layout tool enables users to control how a model on the Workspace will be split across pages in the Print Preview window. To access this tool click the printer icon in the bottom-right of the Workspace. The Printer Page Layout options should appear.
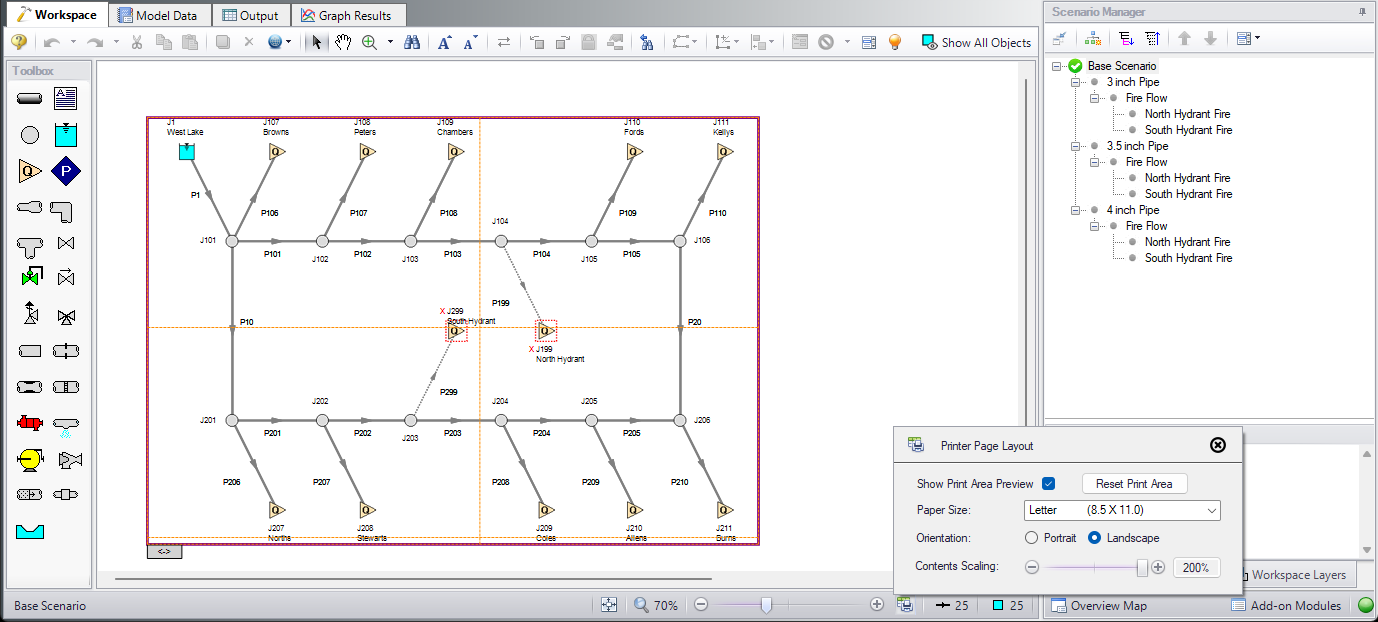
Figure 1: The Printer Page Layout options control how the model is split between pages on the Print Preview
-
Show Print Area Preview - When checked, a purple box will appear on the Workspace which dictates what areas will be printed. Clicking on this purple box will cause sizing handles to appear which can be used to re-size the area. Additionally, the gray box in the lower-left of the purple print area can be used to drag and re-position the area relative to the objects on the Workspace. The purple print area is affected by the Snap to Grid option from the Arrange menu. Furthermore, dotted yellow lines may also be drawn within the purple print area depending on the other settings described below. The dotted yellow lines represent different pages that will be printed. If the dotted yellow lines form a single box around the model, this means the entire model will fit on a single page. If the dotted yellow lines form multiple boxes across the model, regardless of the size of the boxes, the model will be divided such that everything in a single yellow box will appear on its own page once the Print Preview is used.
-
Paper Size - The paper size is a drop down with a selection of page dimensions based on the page sizes. The list of page sizes is determined by whatever printer page sizes are supported by your printer. Selecting one of these sizes will affect the size of the paper the model will be printed on. As such, the size of the boxes formed by the dotted yellow lines from the "Show Print Area Preview" will adjust in size.
-
Orientation - The portrait setting will flip the page such that the longest side from the paper size will align vertically on the page. The Landscape setting will flip the page such that the longest side from the paper size will align horizontally. As such, the boxes created from the "Show Print Area Preview" option will follow suit.
-
Contents Scaling - This feature determines how large the model will appear on each page. As the slider moves, it will appear as though the dotted yellow boxes from the "Show Print Area Preview" are shrinking or growing; however, this does not affect the dimensions of the pages. Instead, when the Print Preview is used the page size will remain the same, but the objects in each box will fit to the pages as displayed on the Workspace.
Print Preview
The Print Preview window allows you to access special print features such as Print Preview and Fit to One Page. It is accessed from the File menu or using the shortcut CTRL + P.
The Print Preview window also offers you a preview of the print content and format for all Primary Windows. By clicking the Print Preview button you can review your printed material at several zoom states. Individual pages can be printed.
The "Fit To Page(s)" feature causes the graphic image generated from the Workspace window to be compressed onto the specified number of pages. This is a convenient feature for creating reports of your model. The Print Preview supports whatever printer page sizes are supported by your printer, so the use of legal paper or larger may allow you to get more visible details. The graphics can also be centered vertically and/or horizontally. You also can fit your content onto multiple pages.
The Page Setup option in the Print Preview window allows you to set the page orientation, paper size/type, and margins.
Additional special printing features affect the Workspace. The "Selected on Workspace" option works with Workspace printing by selectively printing the pipes and junctions currently selected on the Workspace.
By default, the junction icons on the Workspace will be printed with the same colors as displayed on the screen. It also prints the background color as specified in the User Options > Workspace > Colors and Fonts. You can also specify that the junction icons be printed in black and white (still with the color background) or that the entire printout be black and white.
If you added a background picture from the File menu, this picture will be included in the printout.
Finally, if you have a grid displayed on the Workspace, the grid will be included in the printout.
Page options allow the use of a company logo, user comments, titles, and different options for borders.


