Creating, Organizing, and Editing Scenarios
Scenarios are referred to as either a parent or child, plus the Base Scenario, which may be thought of as the root scenario. Upon opening a new model file, only a Base Scenario will be present. To create a new scenario below the Base Scenario, right-click the Base Scenario and select Create Child.
Any scenario can be made current by double-clicking on it.
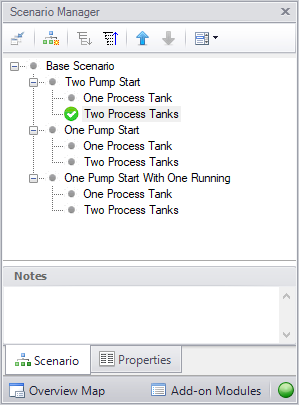
Figure 1 illustrates a model with a Base Scenario with three children: "Two Pump Start", "One Pump Start", and "One Pump Start with One Running". Each of these have two children: "One Process Tank" and "Two Process Tanks", representing the different operating cases where the process fluid could be fed to either one or two storage tanks.

Figure 1: Scenario Manager Window
The "Two Pump Start", "One Pump Start", and "One Pump Start with One Running" scenarios were created by first selecting the Base Scenario and clicking 'Create Child'. Each of the "One Process Tank" and "Two Process Tanks" scenarios were created by choosing 'Create Child' for each of the three different pump configuration scenarios.
Note: Alternatively, one could have made the "Two Pump Start" scenario current and created the "One Process Tank" and "Two Process Tanks" scenarios below it. Then, with "Two Pump Start" still selected, select 'Clone With Children' twice, then rename the new clones "One Pump Start" and "One Pump Start with One Running".
The "One Process Tank" and "Two Process Tanks" scenarios may be thought of as grand children of the Base Scenario. This concept of scenario ancestry is helpful in keeping track of the differences and similarities between scenarios discussed later.
A box with a plus sign next to a scenario indicates it may be expanded to reveal children scenarios while a box with a minus sign indicates the level is fully expanded with all children scenarios shown, if any. No box indicates there are no children. Levels may be expanded by clicking on the plus sign and condensed by clicking on the minus sign.
Right-clicking a scenario provides the following choices:
-
Create Child with No Output - create child scenarios without results saving duplication and load time
-
Rename - renames the selected scenario
-
Delete Scenario - deletes the selected scenario
-
Delete All Children -deletes all children of the selected scenario
-
Clone Without Children - creates a copy of the selected scenario at the same level (a sibling). Cloning a scenario prompts the user for a name for the new scenario
-
Clone With Children - creates a copy of the selected along with its children. Cloning a scenario prompts the user for a name for the new scenario
-
Insert Scenario Above Selected... - creates a new scenario where the selected scenario is and shifts the selected scenario and its children down a level. This can be used to create a new base scenario. If this is done the user will be prompted to rename the previous base scenario.
-
Promote - raises a scenario one level, i.e. from a child to a sibling, active only for scenarios more than one level below the base scenario
-
Copy/Save Scenario Names
-
Copy Scenario Path Name - copy the fully-qualified name of the scenario to the Windows clipboard ("Base Scenario/Case 1/Child 3")
-
Copy Scenario Path Name With File Name - copy the fully-qualified scenario name along with the model name ("Model.fth :: Base Scenario/Case 1/Child 3")
-
Save Scenario Names Only to File... - copy all scenario names on separate lines, with indents to show child/parent relations
-
Save Full Scenario Paths to File... - copy all scenario names on separate lines, with the full path name used for each scenario
-
Save Scenario to File Without Children - saves the selected to scenario to a separate file without its children
-
Save Scenario to File With Children - saves the selected scenario and its children to a separate file
-
Compare to Active Scenario - compares all parameters for all objects between the selected scenario and active scenario and displays the Comparison Grid showing the results
-
Scenario Comparison Tool - opens the Scenario Comparison tool to create a custom scenario comparison
Note: It is important to remember that AFT Impulse’s Edit menu Undo does not apply to Scenario Manager operations. To undo a Rename scenario operation, you can rename the scenario again to the old name. To undo a Clone or Save Scenario operation, you can delete the clone or file created. Once a scenario is deleted or promoted, there is no way to un-delete or un-promote the scenario.
Viewing Scenario Differences
A scenario’s data and that for all of its direct ancestors can be viewed in the Model Data Window. This functionality can be enabled in the Model Data Control window.
Fast Scenario Changes
AFT Impulse remembers the most recent scenario you had open, and allows you to quickly change back to that scenario by using the Last Scenario feature. Last Scenario is found on the View menu and Toolbar.


