Chempak Database Installation
Overview
This optional add-on, which is purchased separately, is a chemical property database of several hundred fluids and gases with the ability to create mixtures. The typical installation places files on the local machine which is recommended. The database files can also be installed on a shared server with additional configuration to point each client machine to the server path. In either case, the installation consists of two steps:
The installer will walk you through these steps. Note: If you already have the data files installed but are having trouble accessing them from the main applications, then you should check the configuration of the Control.aft Files.
Standard Local Installation
-
Install the desired base product(s) first before installing the Chempak Database (ie. Fathom, Arrow, Impulse, or xStream).
-
Navigate to https://www.aft.com and click on the Downloads > Current Versions > Chempak drop-down menu. Download the installer.
-
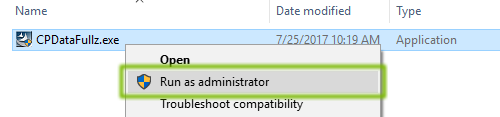
Right-click on the installer and select Run as administrator.
-
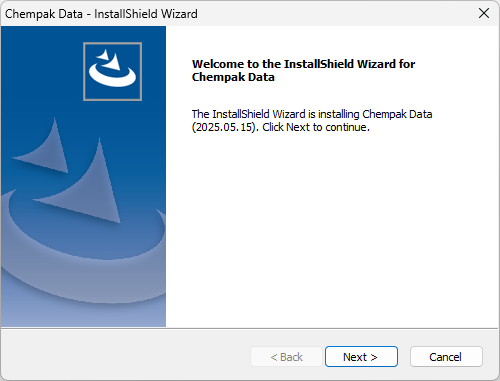
Click Next to begin the installation. This welcome screen displays the Release Date in the format YYYY.MM.DD.
-
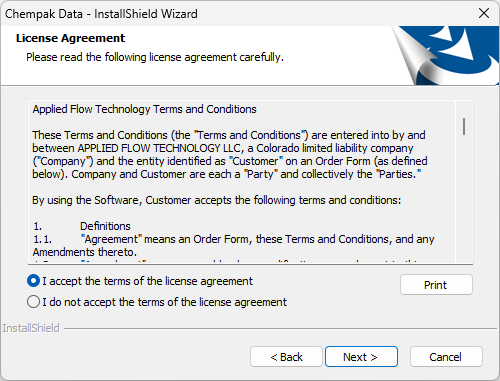
Read and accept the License Agreement.
-
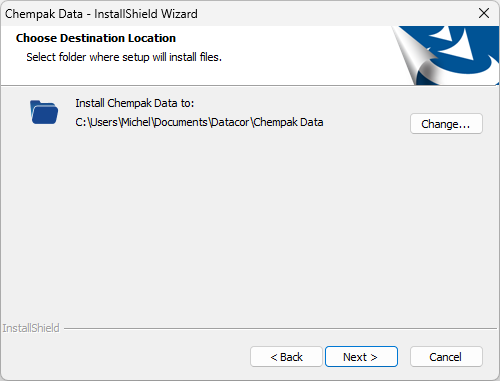
Click Next to accept the default install directory. Changing the install directory is not recommended unless you are an IT professional performing installation on a shared server.
Note: Previous versions of the Chempak installer (2018.02.28) that went alongside with Fathom 13, Arrow 10, Impulse 10, xStream 3, and previous versions used to install the Chempak Data to a default directory of C:\AFT Products\Chempak Data. The current version of the Chempak installer (2025.06.30) uses a default directory of C:\Users\username\Documents\Datacor\Chempak Data. If the Chempak Data is already installed to the previous location, then you can use the Control.aft Files to specify this path without installing a duplicate copy of the data to the new location.
-
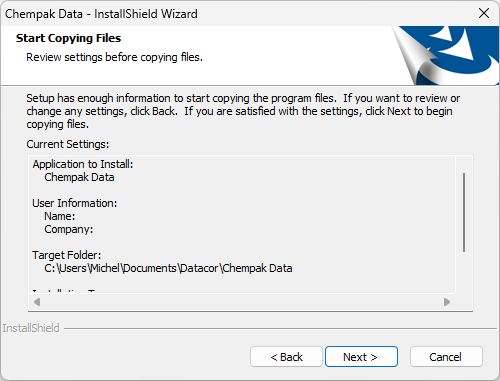
Review the queued installation tasks and click Install.
-
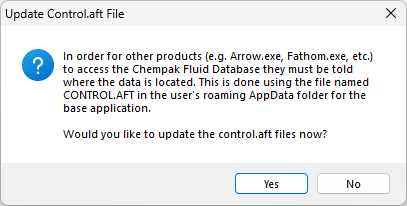
Click Yes to proceed with updating the control.aft files. This allows the base products to reference the correct location where the Chempak Database files are stored.
-
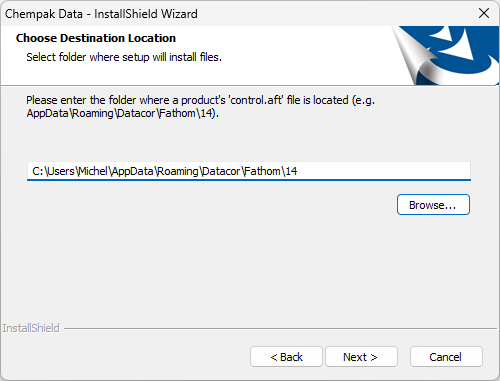
Browse to one of the following directories which contains the control.aft file for the application of choice, then click Next to automatically update the control.aft file so that it points to the Chempak install directory:
For Fathom 14, Arrow 11, Impulse 11, xStream 4, and newer versions:
C:\Users\username\AppData\Roaming\Datacor\Application\Version
For example: C:\Users\username\AppData\Roaming\Datacor\Fathom\14
For Fathom 13, Arrow 10, Impulse 10, xStream 3, and older versions:
C:\AFT Products\Application
For example: C:\AFT Products\AFT Fathom 13
This step can also be done by manually editing the control.aft file(s) in a text editor. For more information see the Control.aft Files section below.
-
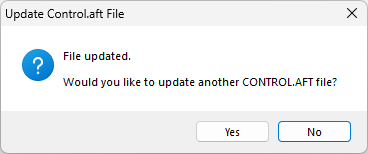
If you have additional applications installed, then click Yes to repeat the process until all control.aft files in the above directories have been updated.
-
Click Finish.
Installation on a Shared Server
For the majority of users we recommend the default installation directory for Chempak on the local machine. Large workgroups with Network Licenses and many client machines may want to consider changing the installation directory to a common shared folder on a server. This will require additional setup as explained below.
Follow the standard instructions but with modifications at the following steps:
-
Change the installation location to whichever folder you intend to use on the server. We recommend naming the folder "Chempak Data". All users must have both read and write access to the folder without needing admin rights (i.e. C:\ProgramData is not suitable since it requires admin rights for write access by default in Windows). For example:
-
\\server\Chempak Data
-
-
Share the Chempak Data folder from the server with the network of client machines. Client machines need both read and write permissions.
-
The control.aft files on the client machines will need to point to the location of the Chempak Data on the server. Follow the section below on Control.aft Files to manually update the ChempakDataPath parameter.
Control.aft Files
The control.aft file is read as the application begins and provides the location of the Chempak Data. Each application has its own control.aft file in the following location:
-
For Fathom 14, Arrow 11, Impulse 11, xStream 4, and newer versions:
C:\Users\username\AppData\Roaming\Datacor\Application\Version
-
For Fathom 13, Arrow 10, Impulse 10, xStream 3, and older versions:
C:\AFT Products\Application
The control.aft file should contain the following heading and line:
[SEARCH PATHS]
ChempakDataPath = <Path>
The <Path> is the Chempak Database installation directory. If the Chempak Database is installed to a non-standard location or shared server directory, then this path can be manually specified. This should be done for any user accessing Chempak. Consider using batch scripts or group policies to push the same control.aft file to all users.
If the <Path> is blank, then Fathom 14, Arrow 11, Impulse 11, and xStream 4 will search the following paths in order:
-
C:\AFT Products\Chempak Data
-
C:\Users\username\Documents\Datacor\Chempak Data