eLicense Manager
Overview
The eLicense Manager is a separate utility executable that is bundled with the normal software installation. It allows end user management of the eLicense. and is available from . All Datacor Flow Simulation applications must be closed in order to open the eLicense Manager. A limited version is available from within the applications under the Tools menu > eLicense Information.
Location:
-
Fathom 14, Arrow 11, Impulse 11, and xStream 4:
C:\Program Files (x86)\Datacor\Application\AFTeLicenseManager.exe
-
Fathom 13, Arrow 10, Impulse 10, xStream 3, and earlier:
C:\AFT Products\AFT Application\AFTeLicenseManager.exe
|
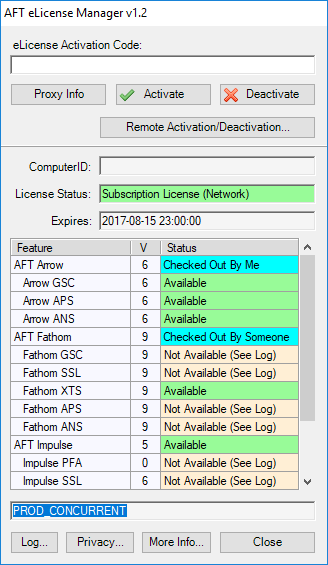
eLicense Manager opened from it's executable |
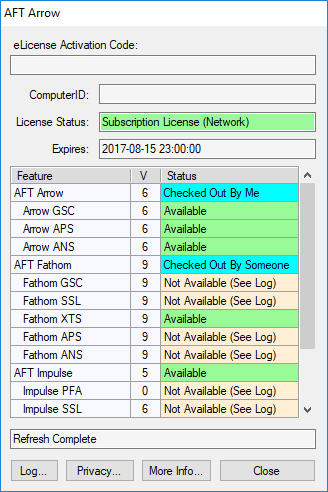
Limited eLicense Info opened from within an app |
|
ComputerID |
Unique identifier assigned to the client machine by the eLicense service. |
|
License Status |
Indicates the type of license as well as if it is Perpetual or Subscription based. |
|
Expires |
The date the eLicense will cease functioning. |
|
Feature |
List of all applications and add-on modules. |
|
V (version) |
The latest allowable version of the feature. |
|
Status |
Information about the Seats available for the relevant application or add-on module. In the above example screenshots, the current User has Arrow open (Checked Out by Me) and a colleague has Fathom open (Checked Out by Someone). Features labeled as Not Available mean that the application or add-on module is not Licensed to this Organization. Features labeled as Available mean that the application or add-on module has Seats that are available to be checked out. |
Deactivating an eLicense
The Activate and Deactivate buttons have a different effect depending on the License Type:
Network eLicense:
-
Activate - This is not needed for Network eLicenses and it is not recommended to click it. Seats on the license get checked out/in automatically as users open/close the software. If you click Activate with a Network eLicense, then it will ping the licensing server and determine the current status of the features. This can be useful for determining if there are seats available, but it is more practical to use the eLicense Information Web Portal discussed below. If you click Activate, it will determine the availability by quickly checking a seat out and then back in again, and at the end it will create an activation line item that is listed on the web portal as "License Activated - nothing checked out", that will stay there indefinitely unless you click Deactivate. While that activation line item doesn't affect the seat count/availability it does clutter the table view of current usage on the web portal. You can remove that line item by clicking Deactivate from the same machine.
-
Deactivate - This will return any seats that are checked out by the current user. Seats used by colleagues will remain in use. This can be useful to purge seats that are stuck in use by the current user even if they have closed the application.
Standalone eLicense:
-
Activate - This will activate and lock the license to the current client machine. Standalone eLicenses can only be active on a single client machine.
-
Deactivate - This will deactivate and unlock the license. This needs to be done before moving the license to another client machine.
Note that Deactivation does not remove the Registration.txt files. Starting an application will re-activate the eLicense.
Access Through a Proxy
If the client machine accesses the internet through a proxy, then the connection information must be entered by clicking the Proxy Info button in the eLicense Manager and filling in the form. Note that you may need to launch the eLicense Manager with administrator privileges to ensure there is write access to the necessary location where this info is stored. Furthermore, if your Host Name is longer than the character limit in this window, then use the numeric IP address instead.

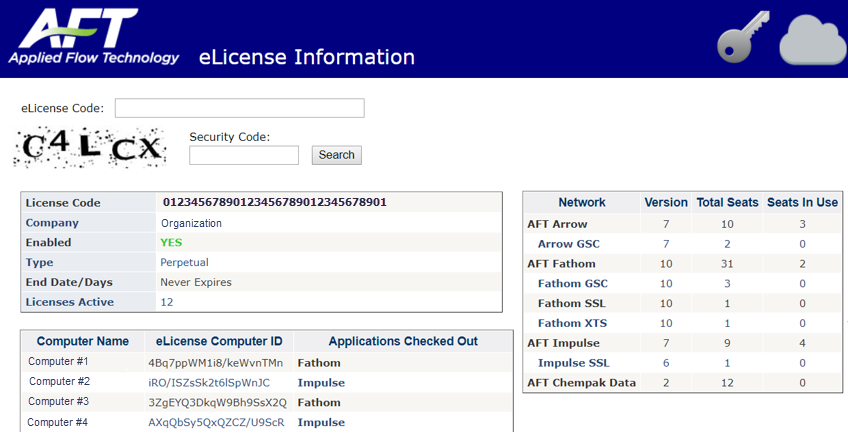
More Info: eLicense Information Web Portal
The More Info button near the bottom of the eLicense Manager will open a web page that gives an overview of the current eLicense. The upper-left of the page lists basic information about the eLicense. The right-hand side lists the Licenses available and how many seats are currently in use for each product. The lower-left will display a list of Computer Names and ComputerIDs that have currently activated the eLicense. If an application is unavailable to be checked out and it is unknown which client machine is using the application, then this page can provide valuable information about what client machines currently have license seats checked out.
Moving a Standalone eLicense
Standalone eLicenses can only be active on a single client machine at a time. Once active, they will be locked to said client machine. Occasionally it may be necessary to move the Standalone eLicense to another machine.
-
Click Deactivate in the eLicense Manager on the currently activated client machine.
-
Follow the standard installation instructions on the new client machine.
-
Click Activate in the eLicense Manager on the new client machine.
-
If the eLicense was previously Activated on the new client machine, simply starting an application will re-activate the eLicense.
-
Remote Activation for Standalone eLicenses
Standalone eLicenses can be used on Air-Gapped or Internet Isolated client machines via Remote Activation. This procedure requires having access to a separate Internet Connected Machine. The activation will only work on a single Windows user account. This means that the same Windows user must perform all of the steps below, and will be the only account on the machine that can access the software.
On the Isolated Client Machine:
-
Complete the standard software installation procedure.
-
Open the eLicense Manager.
-
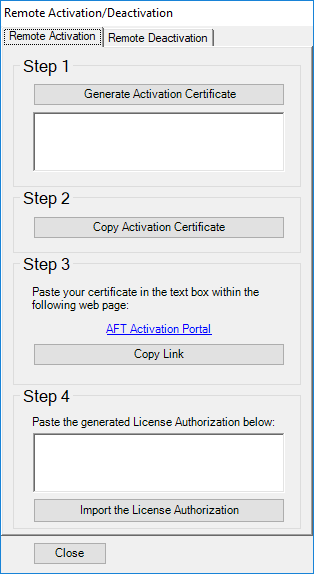
Click Remote Activation/Deactivation.
-
On the Remote Activation tab, click Generate Activation Certificate.
-
Click Copy Activation Certificate and paste it into a text editor like Notepad.
-
Save and transfer the text file to the Internet Connected Machine.
On the Internet Connected Machine:
-
Navigate to this link: Remote Activation Portal.
-
If you have the eLicense Manager installed on the internet connected machine, you can return to the Remote Activation tab and click the link.
-
-
Open the transferred text file, select all characters of the certificate with Ctrl+A, copy, and paste the Activation Certificate into the text box on the web portal.
-
Click the Activate button on the web portal.
-
If successful, the web portal will update the text box to return a License Authorization code.
-
If this step fails, check to make sure you copied the entire Activation Certificate.
-
If you accidentally missed even a single character, it can fail.
-
-
Copy the entire License Authorization code by clicking into the text box on the web portal, select all characters with Ctrl+A, copy, and paste the License Authorization code into a new text file.
-
Save and transfer the new text file back to the Internet Isolated Machine.
On the Isolated Client Machine:
-
Open the License Authorization text file, select all characters with Ctrl+A, copy, and paste into the eLicense Manager Remote Activation text box under Step 4.
-
Click Import the License Authorization.
-
If successful, you will see a pop-up stating that the license is now activated.
-
Close the eLicense Manager and try opening the application.
-
Remote Deactivation for Standalone eLicenses
A similar process can be followed on the Remote Deactivation tab.
