Creating, Organizing, and Editing Scenarios
Scenarios are referred to as either a parent or child, plus the Base Scenario, which may be thought of as the root scenario. Upon opening a new model file, only a Base Scenario will be present. To create a new scenario below the Base Scenario, right-click the Base Scenario and select Create Child.
Any scenario can be made current by double-clicking on it.
Figure 1 illustrates a model with a Base Scenario with two children, "English Units" and "Metric Units". These have three children, ‘3 inch Pipe’, ‘3.5 inch Pipe’ and ‘4 inch Pipe’, representing three different sized pipe runs. Each of these has one child scenario "Fire Flow" and each of these, in turn, has two children, ‘North Hydrant Fire’ and ‘South Hydrant Fire’, for the two operating cases.
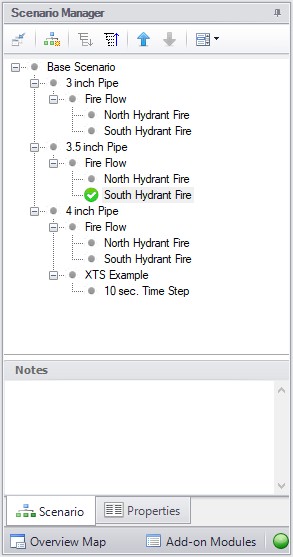
Figure 1: Scenario Manager Window
‘English Units’ and ‘Metric Units’ were created by first selecting the Base Scenario and Creating a Child.‘3 inch Pipe’, ‘3.5 inch Pipe’ and ‘4 inch Pipe’ were created by first selecting the 'English Units' Scenario then Creating Children. 'Fire Flow' was created by clicking on '3 inch Pipe' and creating the child. ‘North hydrant open’ and ‘South hydrant open’ were, in turn, created by selecting each of the above children scenarios for the three different pipe run sizes, then Creating Children.
Note: Alternatively, one could have made the 'English Units' scenario current, created the ‘3 inch Pipe’ child, then selected it and created the 'North Hydrant Fire' and 'South Hydrant Fire' scenarios below it, then, with '3 inch Pipe' still selected, selected Clone With Children twice, then rename the new clones '3.5 inch Pipe' and '4 inch Pipe'
The ‘North Hydrant Fire’ and ‘South Hydrant’ scenarios may be thought of as great great grand children of the Base Scenario. This concept of scenario ancestry is helpful in keeping track of the differences and similarities between scenarios discussed later.
A box with a plus sign next to a scenario indicates it may be expanded to reveal children scenarios while a box with a minus sign indicates the level is fully expanded with all children scenarios shown, if any. No box indicates there are no children. Levels may be expanded by clicking on the plus sign and condensed by clicking on the minus sign.
Right-clicking a scenario provides the following choices:
-
Create Child with No Output - create child scenarios without results saving duplication and load time
-
Rename - renames the selected scenario
-
Delete Scenario - deletes the selected scenario
-
Delete All Children - deletes all children of the selected scenario
-
Clone Without Children - creates a copy of the selected scenario at the same level (a sibling). Cloning a scenario prompts the user for a name for the new scenario
-
Clone With Children - creates a copy of the selected along with its children. Cloning a scenario prompts the user for a name for the new scenario
-
Insert Scenario Above Selected... - creates a new scenario where the selected scenario is and shifts the selected scenario and its children down a level. This can be used to create a new base scenario. If this is done the user will be prompted to rename the previous base scenario.
-
Promote - raises a scenario one level, i.e. from a child to a sibling, active only for scenarios more than one level below the base scenario
-
Copy/Save Scenario Names
-
Copy Scenario Path Name - copy the fully-qualified name of the scenario to the Windows clipboard ("Base Scenario/Case 1/Child 3")
-
Copy Scenario Path Name With File Name - copy the fully-qualified scenario name along with the model name ("Model.fth :: Base Scenario/Case 1/Child 3")
-
Save Scenario Names Only to File... - copy all scenario names on separate lines, with indents to show child/parent relations
-
Save Full Scenario Paths to File... - copy all scenario names on separate lines, with the full path name used for each scenario
-
-
Save Scenario to File Without Children - saves the selected scenario to a separate file without its children
-
Save Scenario to File With Children - saves the selected scenario and its children to a separate file
-
Compare to Active Scenario - compares all parameters for all objects between the selected scenario and active scenario and displays the Comparison Grid showing the results
-
Scenario Comparison Tool - opens the Scenario Comparison tool to create a custom scenario comparison
Note: It is important to remember that AFT Fathom’s Edit menu Undo does not apply to Scenario Manager operations. To undo a Rename scenario operation, you can rename the scenario again to the old name. To undo a Clone or Save Scenario operation, you can delete the clone or file created. Once a scenario is deleted or promoted, there is no way to un-delete or un-promote the scenario.
Viewing Scenario Differences
Differences between scenarios can be viewed in two different ways. All data associated with any selection of scenarios can be viewed using the Scenario Comparison tool. Alternatively, a scenario’s data compared to all of its direct ancestors can be viewed in the Model Data Window. This functionality can be enabled in the Model Data Control window.
Output from different scenarios can also be displayed in the Output window using Output Control features.
Fast Scenario Changes
AFT Fathom remembers the most recent scenario you had open, and allows you to quickly change back to that scenario by using the Last Scenario feature. Last Scenario is found on the View menu and the Toolbar.


