Joining or Splitting Pipes
When pipes are present in the Workspace, users can both combine and split up pipes. This can be done either to clean up the model visually or to further manipulate the model.
Joining Pipes
When multiple pipes are placed in the workspace separated by junctions without having other flowpaths splitting off, those pipes and intermediate junctions can be combined into a single pipe. The new pipe will have a total length equal to the sum of the combined pipe lengths, and any losses associated with the intermediate junctions will be summed and entered as additional Fittings & Losses. It will also have the elevation profile of the original pipes and junctions entered as Intermediate Pipe Elevations.
The pipes being combined must have the same material, size, type, friction model, and wavespeed to be combined. In addition, the pipes must be pointing in the same direction.
Joining pipes may cause some junction data to be lost such as special conditions, loss factors for reverse flow, and ignored transients.
To join pipes and junctions in the model, select the "Join Pipes/Junctions" option from the Edit menu. The Join Pipes window will be shown with more information on pipes that can be combined in the model. The behavior of the Join Pipes/Junctions window will vary depending on if junctions are selected on the Workspace when the Join Pipes/Junctions option is selected.
Note: For maintenance releases prior to November 2022 the Join Pipes/Junctions window did not exist. Instead pipes and junctions selected in the Workspace would be joined automatically when the "Join Selected Pipes/Junctions" option was selected in the Edit menu.
-
If junctions are selected on the Workspace, the Join Pipes/Junctions window will open with only the selected junctions shown in the list.
-
If no junctions are selected on the Workspace, the Join Pipes/Junctions window will open with all junctions that can be combined shown in the list. Any junctions that can be combined and won't cause a loss in data at that junction will be selected automatically.
Once the Join Pipe/Junctions window is opened the selections can be modified before joining the pipes. The options below the table can be enabled/disabled in order to filter the shown junctions based on if they are selected on the workspace, if they will loose data when combined, or if they can't be combined.
If any junctions are selected that would loose data when combined, an additional button will appear near the bottom of the window that allows junctions that would have data loss to be deselected. It is recommended to select this button before joining the pipes/junctions unless you are certain the lost data is no longer required.
To join the pipes at the junctions selected in the Join Pipes/Junctions window, click the Join Selected Junction(s) button at the bottom of the window.
Splitting Pipes
An existing pipe in the workspace can be split into multiple pipes two different ways. First, holding the Shift key while placing a junction along the pipe will split the pipe in two and insert the selected junction.
Second, pipes with Intermediate Pipe Elevations can be split into separate pipes at any or all of those intermediate elevations. This can be done by selecting a pipe with Intermediate Pipe Elevations and clicking Edit -> Split Pipe at Intermediate Elevations. A window will open to select which intermediate elevations to make into new junctions.
The pipe can be split at all intermediate elevations, or at selected locations by checking the box next to each elevation point the pipe should be split at. When the pipe is split, a branch will be created for each of the selected elevation points. If desired, a name can be entered for each new branch in the New Junction Name column of the table. Any points not selected will be retained in the intermediate elevation table of the appropriate pipe in the Workspace.
Note: When splitting a pipe at intermediate elevations, the pipe in the Workspace must be long enough to place the necessary number of branches in the pipe before the split can be completed. If insufficient space is available, the user will be required to exit the Split Pipe at Intermediate Elevations window and rearrange the model to create space before Impulse can perform the split action.
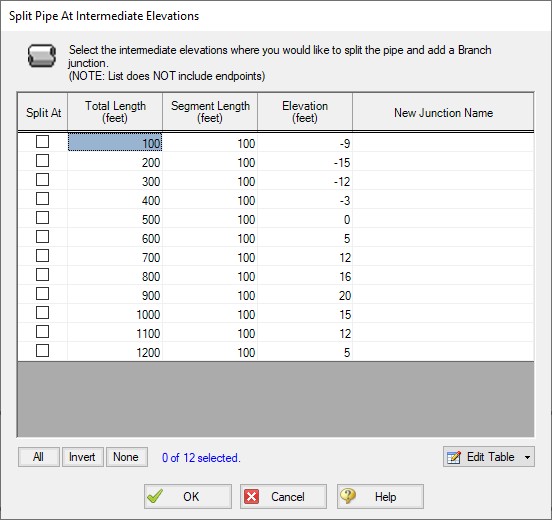
Figure 1: Split Pipe at Intermediate Elevations window
For pipes with a large number of intermediate elevations, it may be more convenient to define the split points in a spreadsheet. This can be done from the Edit Table button at the bottom of the window by selecting Export to File. This will export the table to a *.csv table which can be opened in Excel, as is shown in Figure 2.
The table can be updated by changing the "Split At" column value to Yes for each location that the pipe will be split at. Branch names can also be entered under "New Junction Name" column for the appropriate points. Note that it is important to not change any of the Length or Elevation columns in the *.csv file, as this will prevent the file from being imported. To import the file into Impulse, select "Import From File" from the Edit Table button, then browse to the updated *.csv file.
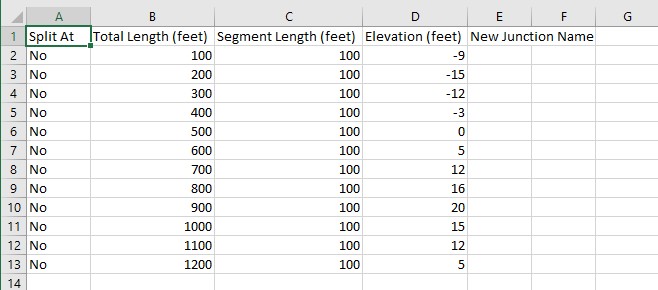
Figure 2: Exported *.csv file for splitting a pipe at intermediate elevations
Related Topics
Related Blogs