Creating, Organizing, and Editing Scenarios
Scenarios are referred to as either a parent or child, plus the Base Scenario, which may be thought of as the root scenario. Upon opening a new model file, only a Base Scenario will be present. To create a new scenario below the Base Scenario, right-click the Base Scenario and select Create Child.
Any scenario can be made current by double-clicking on it.
Figure 1 illustrates a model with four levels of scenarios. The Base scenario includes two child scenarios: “3-inch Pipe” and “4-inch Pipe.” Each of these scenarios contains child scenarios named “North Production” and “South Production.” At the final level, each production scenario includes child scenarios named “To Storage Tank A” and “To Storage Tank B.”
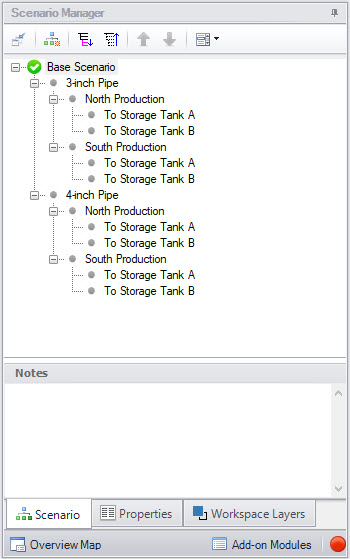
Figure 1: Scenario Manager Window
The “3-inch Pipe,” and “4-inch Pipe” scenarios are created by right-clicking the “Base Scenario,” selecting the “Create Child…” option, and entering a name for the new child scenario. The “North Production,” “South Production,” “To Storage Tank A," and "To Storage Tank B" scenarios can be created using the same steps.
Streamlining Scenario Tree Construction: A Bottom-Up Approach
A scenario tree, like the one described above, can be created manually by defining each scenario individually. However, a more efficient method is to first build a single branch and configure each scenario with the necessary modifications, such as closing valves or adjusting a pipe’s diameter. The process begins at the lowest level in the hierarchy, where scenarios are cloned along with their child scenarios to expand the tree. Then, moving back up to the Base Scenario, a complete comparison of all possible combinations can be completed.
For example, consider the scenario tree outlined above. First, build the initial branch from the “Base Scenario” to “To Storage Tank A.” Once this branch is complete, clone the final scenario, “To Storage Tank A,” and create a new scenario called “To Storage Tank B.” Apply the necessary modifications to define it correctly. Next, move up the hierarchy and clone “North Production” along with its child scenarios to create “South Production.” Adjust the new scenario as needed. When done correctly, only the “South Production” scenario requires direct edits, while all changes automatically apply to its child scenarios. For more details, see Scenario Inheritance. Finally, clone the “3-inch Pipe” scenario along with its child scenarios to introduce the “4-inch Pipe” variation.
This bottom-up approach significantly reduces the number of manually defined scenarios. In a set of 15 scenarios, only 7 require direct configuration. In contrast, a top-down approach would require defining all 15 scenarios separately. It would begin by defining both pipe scenarios, followed by the production line scenarios. As a result, the “North Production” scenario would need to be defined twice, and each tank scenario would need to be created four times.
Right-clicking a scenario provides the following choices:
-
Create Child with No Output - create child scenarios without results saving duplication and load time
-
Rename - renames the selected scenario
-
Delete Scenario - deletes the selected scenario
-
Delete All Children - deletes all children of the selected scenario
-
Clone Without Children - creates a copy of the selected scenario at the same level (a sibling). Cloning a scenario prompts the user for a name for the new scenario.
-
Clone With Children - creates a copy of the selected along with its children. Cloning a scenario prompts the user for a name for the new scenario.
-
Insert Scenario Above Selected... - creates a new scenario where the selected scenario is and shifts the selected scenario and its children down a level. This can be used to create a new base scenario. If this is done the user will be prompted to rename the previous base scenario.
-
Promote - raises a scenario one level, i.e. from a child to a sibling, active only for scenarios more than one level below the base scenario
-
Copy/Save Scenario Names
-
Copy Scenario Path Name - copy the fully-qualified name of the scenario to the Windows clipboard ("Base Scenario/Case 1/Child 3")
-
Copy Scenario Path Name With File Name - copy the fully-qualified scenario name along with the model name ("Model.xtr :: Base Scenario/Case 1/Child 3")
-
Save Scenario Names Only to File... - copy all scenario names on separate lines, with indents to show child/parent relations
-
Save Full Scenario Paths to File... - copy all scenario names on separate lines, with the full path name used for each scenario
-
Save Scenario to File Without Children - saves the selected to scenario to a separate file without its children
-
Save Scenario to File With Children - saves the selected scenario and its children to a separate file
-
Compare to Active Scenario - compares all parameters for all objects between the selected scenario and active scenario and displays the Comparison Grid showing the results
-
Scenario Comparison Tool - opens the Scenario Comparison tool to create a custom scenario comparison
Note: It is important to remember that xStream’s Edit menu Undo does not apply to Scenario Manager operations. To undo a Rename scenario operation, you can rename the scenario again to the old name. To undo a Clone or Save Scenario operation, you can delete the clone or file created. Once a scenario is deleted or promoted, there is no way to un-delete or un-promote the scenario.
Viewing Scenario Differences
Differences between scenarios can be viewed in several different ways for both input and output parameters. Input data can be compared through three methods:
-
All data associated with any selection of scenarios can be viewed using the Scenario Comparison tool.
-
A scenario’s data compared to all of its direct ancestors can be viewed in the Model Data window. This functionality can be enabled in the Model Data Control window.
-
A Scenario Comparison Layer can be made through Workspace Layers to compare data between two scenarios and overlay this information directly on the model.
Output from different scenarios can be displayed in the Output window using Multi-Scenario Output Control features and graphed in the Graph Results window.
Fast Scenario Changes
xStream remembers the most recent scenario you had open, and allows you to quickly change back to that scenario by using the Last Scenario feature. The Last Scenario feature is found on the View menu and Common Toolbar .
.