Scenario Comparison Layer
A Scenario Comparison Layer is an Advanced Layer available through Workspace Layers that compares the current scenario with another scenario on the Workspace through color coding affected objects. This layer enhances visualization of different scenarios by quickly comparing two different model states directly on the Workspace. The color coding and labeling aids in quickly identifying and reviewing changes that have been made between scenarios. This makes it easier to navigate large or unfamiliar models and identify objects with differences between scenarios, allowing users to quickly understand the intent of the model and the design decisions.
Note: There can be only one advanced layer visible at a time, and they override the behavior of standard layers in the model - in this case superseding any colors and labels assigned to objects by other layers.
To create a Scenario Comparison Layer, click the new layer icon on the Layers Toolbar, select the Scenario Comparison layer type, and name the new layer. To edit the layer, go to its Layer Settings menu, accessed in the same manner as a standard layer.
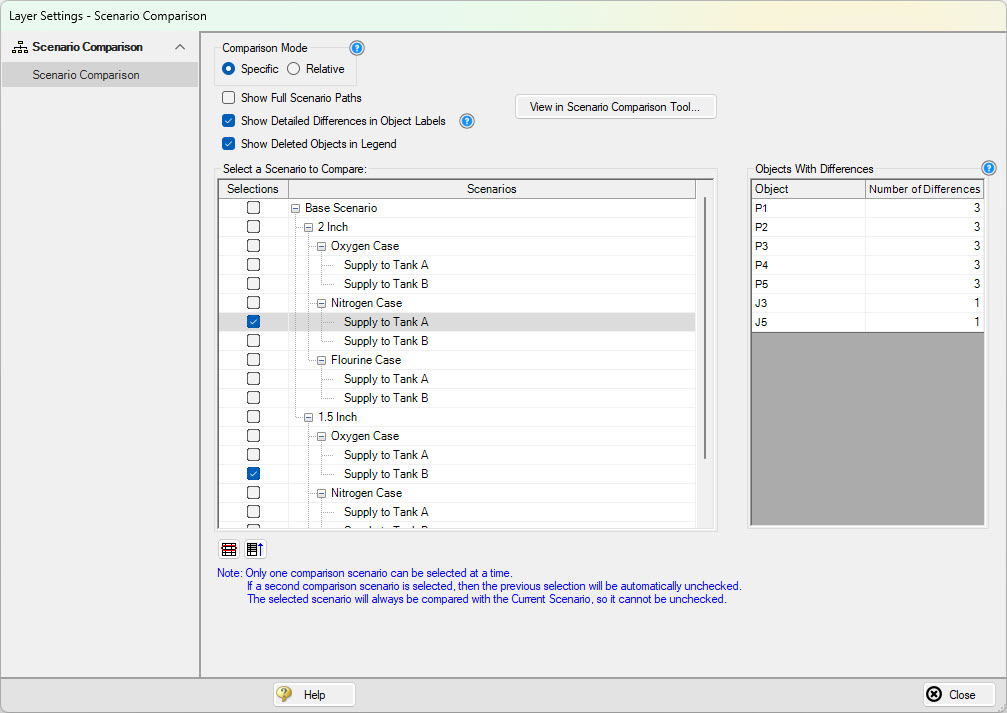
Figure 1: Layer Settings for a Scenario Comparison Layer
In the Scenario Comparison Layer Settings window, a list of all scenarios will be displayed on the left side of the window. The currently active scenario will always be selected automatically and is required to be one of two compared scenarios. A second scenario can be selected to compare model states on the Workspace with the active scenario. Only two scenarios can be compared at a time. Objects with differences between the two selected scenarios will be listed on the right, and the number of differences between the objects is shown. Clicking a pipe or junction from this list will automatically move the Workspace to this object and highlight it.
At the top of the window there are some additional options to configure the Scenario Comparison Layer. The Comparison mode can be configured which controls the method in which the compared scenario is selected. The full scenario path can be shown within the object label rather than only the scenario name itself. This can be useful when scenarios are named similarly to prevent any confusion when reviewing the compared information. The option to display detailed differences between objects within the object labels can be configured as well as the option to list any deleted objects that may exist between the two scenarios in the legend. Additionally, the currently configured scenario comparison can be quickly opened within the Scenario Comparison Tool for quick visibility in a tabular format. This will display a grid with the differences between the selected objects in the two scenarios.
The Comparison Mode can be selected between Specific and Relative to determine which scenarios are being compared when the Scenario Comparison Layer is visible. The Specific option requires a specific scenario to be selected to be compared with the active scenario. The Relative Comparison option allows the selection of a scenario to compare based on its relative position to the current scenario within the scenario manager. This selection can be a parent, sibling, or child scenario, providing flexibility in evaluating how different scenarios relate to one another when viewing the Scenario Comparison Layer from different active scenarios. By leveraging this option, the Scenario Comparison Layer can vary the compared scenario depending on what the currently active scenario is, avoiding the need to reconfigure the scenario comparison selection when switching scenarios.
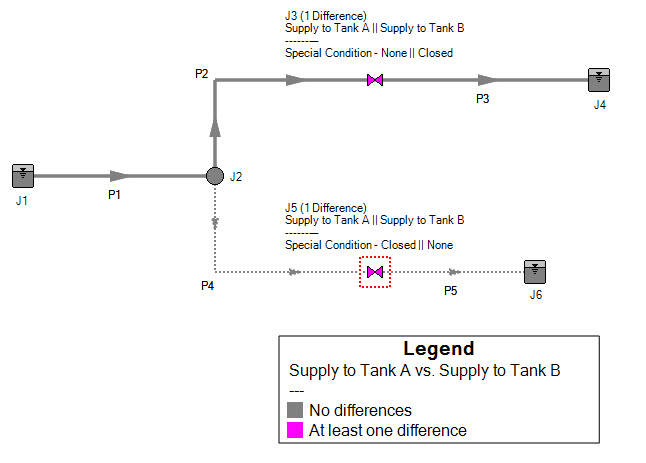
Figure 2: Scenario Comparison Layer Appearance on the Workspace
On the Workspace, objects that have no differences between scenarios will appear grayed out. Objects with differences will appear pink by default indicating there is at least one difference between scenarios. The Legend displays this color coding and lists the two scenarios being compared. The color coding can be modified through the Global Layer Settings.
Specific parameter differences between scenarios can be viewed while the Scenario Comparison Layer is active by holding right-click on the desired object. Differences will be shown in the Inspection grid.