Keyboard Shortcuts for Workspace
Selection Box
-
Select all objects completely inside box by dragging cursor from left to right
-
Select all object completely or partially inside box by dragging cursor from right to left
Pipe Drawing Tool
-
If you double-click the pipe drawing tool, it will allow you to draw multiple pipes at a time. Clicking Esc or clicking the pipe drawing tool again will deactivate the tool.
-
When orthogonal drawing is off and you hold down the SHIFT key while drawing pipes on the Workspace, you can draw pipes that are perfectly horizontal or vertical. When the orthogonal drawing is on and you hold down the SHIFT key down while drawing new pipes on the Workspace the pipe vertex will flip. If you move an existing pipe and hold the shift key while selecting a handle at one of the pipe endpoints a new vertex will be inserted at that point endpoint.
-
If you hold down the CTRL key when completing the pipe drawing (just before releasing the mouse button), the Pipe Drawing Tool remains active, and you can draw a series of pipes without returning to the Toolbox each time.
-
To add pipe segments, use CTRL+SHIFT+Y
-
To remove all pipe segments, use CTRL+SHIFT+N
Junctions
-
If you double-click any junction in the Toolbox, you will be able to place multiple of that junction on the Workspace by clicking the Workspace where you would like to place each junction. Clicking Esc or clicking the junction icon in the Toolbox again will deactivate the tool.
-
If you hold down CTRL key and select a junction from the Toolbox and drop it onto an existing Workspace junction, the old junction will "morph" into the new one. The junction type will change to the new junction type, and data that can be kept will be copied into the new junction.
-
If you hold down the CTRL key then drag a junction on the Workspace which has pipes connected to it, the junction will move but the pipes will not move with it
-
If you hold down the SHIFT key while selecting a junction from the Toolbox and then drop the junction onto an existing pipe, the pipe will split into two pipes. You will specify the length of the first pipe and the second pipe will be automatically set to the remaining length from the original pipe. Thus the sum of the two pipe lengths will equal the length of the original pipe. You can also choose which pipe contains any Fittings & Losses that were specified within the original pipe.
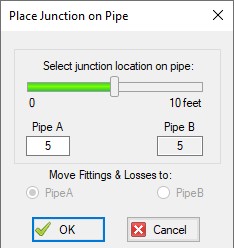
Figure 1: Split pipe keyboard shortcut
Pipe and Junction Properties Window
-
When in a pipe or junction Properties Window you can toggle the highlight feature by pressing the F2 function key. You can also toggle this from the View menu.
-
When in a Pipe Properties Window, if you press the F5 function key, you will jump to the next highest numbered pipe. If you press the CTRL key while pressing the F5 function key, you will jump to the next lowest numbered pipe. The F5 function key also behaves this way for junction Properties Windows.
Pan and Zoom
-
The Workspace position can be moved with CTRL + arrow keys.
-
The Zoom level can be adjusted with CTRL + (+/-)
-
The Zoom level can be reset to default with CTRL + 0
-
Mouses with scroll wheels can be used to zoom by scrolling, or to pan by clicking and holding the scroll wheel
Switching Primary Windows
-
Go to the Workspace window using CTRL + W
-
Go to the Model Data window using CTRL + M
-
Go to the Output window using CTRL + U
-
Go to the Graph Results window using CTRL + G
-
Go to the Visual Report window using CTRL + I
-
When ANS is active, go to the Sizing window using CTRL + N
Other
-
Many commands use common windows shortcuts. Some of the most common are listed here:
-
Run the model: CTRL + R
-
Save the model: CTRL + S
-
Open a file: CTRL + O
-
Undo the last action: CTRL + Z
-
Cut: CTRL + X
-
Copy: CTRL + C
-
Paste: CTRL + V
-
Other available shortcuts can be seen listed by their command on the menus


