Pipe Material Library
Adding Custom Pipe Materials to the Pipe Materials Library
You can open the Edit Pipe Materials panel from the Library Menu. Using this panel, you can easily add to the user library the geometric information for any pipe material in the length units of your choice. Custom pipe materials can be selected for use in the Pipe Properties Window, minimizing the data entry required by the user.
Pipe materials typically have a range of nominal sizes and a specific type, class, or schedule that describes the actual dimension. AFT Fathom works with the inner diameter of the pipe, since that is the parameter that directly affects the fluid mechanics.
To add custom pipe materials to the user library, choose the entry location you desire in the list on the left (Pipe Materials, Sizes and Types), then click the New button below. For example, to add an entirely new material, click the Pipe Materials item at the top of the list then click the New Material button. To add a new size for an existing material (say Steel), click Steel in the list then click the New Size button. To add a new type to the Steel 1 inch size, click 1 inch under the Steel material in the list then click the New Type button.
When adding a new material, you also will be asked to specify a geometry, enter a nominal size, type of material, diameter, friction data set, and friction value to define the first data. Optionally you can add in a wall thickness. From then on you can enter additional nominal sizes and types. The name descriptors you choose for the material, size, and type are at your discretion. They can contain text mixed with relevant numbers if you desire.
You can also add multiple Friction Data Sets for each pipe material. This allows you to keep, for example, different friction values that may apply to the same pipe under different conditions. These conditions could be related to the age of the pipe or the type of fluid being carried. See the Friction Data Sets section below for more information.
In addition to manual entry of the custom pipe materials, you also can import pipe material data from a file. When you click the Import From File button, a dialog box will appear explaining the necessary import file format. By choosing to import from a file, you will be able to have a separate copy of the data for later access.
Friction Data Sets
Friction Data Sets are pipe friction values for a particular pipe condition.
To create a new Friction Data Set select a Pipe Material, Size, or Schedule to associate the data set with, then click New Data Set from the Friction Data Set tab on the right (Figure 1). Modify the Friction Data Set description to provide a name, then enter the Friction Model and Value.
A Friction Data Set can be associated with the entire pipe material, or with specific sizes or types. For instance, a friction data set associated with Steel (i.e., the top level) might be called "25 year usage" and have a roughness value of 0.005 inches. This data set is then available to all sizes and types of steel. However, if "25 year usage" is associated only with the 1 inch of Steel, it will apply only to the pipe schedules that are 1 inch.
You can also associate friction data sets with a specific type (i.e., schedule). For instance, you can make a "25 year usage" and associate it only with 1 inch schedule 40 Steel pipe and assign its roughness value as 0.006 inches. Then all Steel pipe would use 0.005 inches for "25 year usage" friction while the different value for 1 inch schedule 40 of 0.006 inches would supersede the value of 0.005 inches associated with all Steel pipe.
Finally, among multiple friction data sets you can specify a default data set.
Multiple friction data sets can be created for each type of pipe material. For example, there may be separate friction data sets for Steel pipe such as: New Pipe, 10 Year Use, 20 Year Use and 30 Year Use. Typically, the older pipes will have higher friction.
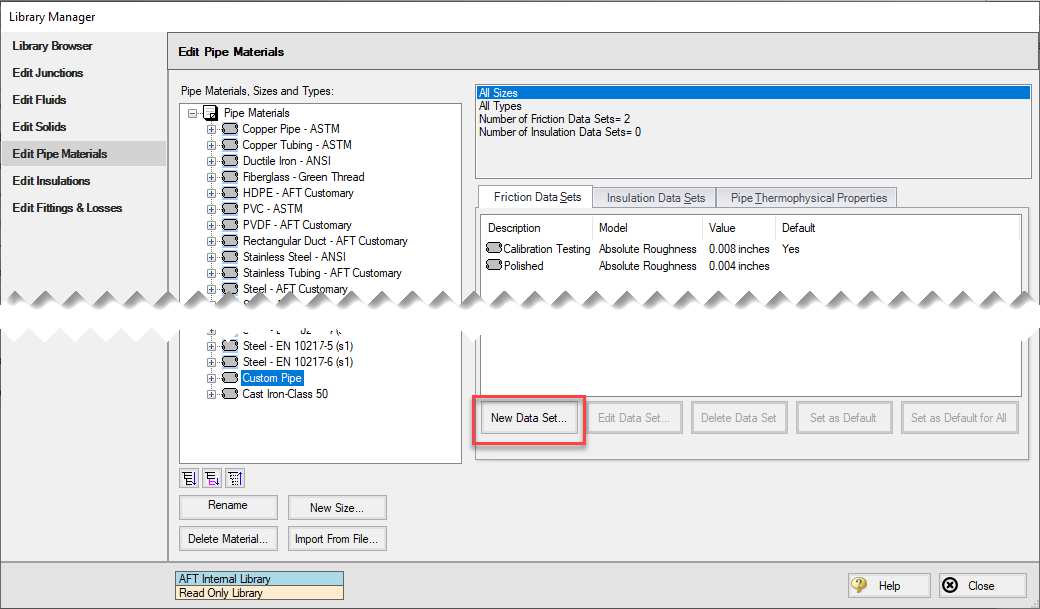
Figure 1: Friction Data Set tab on the Edit Pipe Materials panel
Insulation Data Sets
Insulation data sets are similar to friction data sets. An insulation data set can be associated with the entire pipe material, or with specific sizes or types. Insulation data sets are based on insulation data that has been specified in the Insulation Library. An insulation type must be defined first in the Insulation Library before it can be used for an Insulation Data Set.
To create an insulation data set select the pipe material, schedule, or type that will be associated with the data set in the list on the left, then click the Insulation Data Set tab on the right and select the New Data Set button. Modify the Insulation Data Set description to provide a name, then choose an Insulation Library from the drop-down and define an Insulation thickness value. Once an insulation Data Set is defined it can be selected for use in the Pipe Properties window with Heat Transfer enabled.
As an example, an insulation data set associated with Steel (i.e., the top level) might be based on insulation data in the Insulation Library called "Denver Heating Company K-Series". You might assign it a thickness of 1 inch and name it "Colorado Standard". Once entered, all steel pipe sizes would have a Colorado Standard insulation data set based on Denver Heating Company K-Series insulation that is one inch thick.
In practice, different thickness would likely be associated with different pipe sizes. To accomplish this, you could create insulation data sets for pipe one inch or less, call them "Colorado Standard", and make them ¼ inch thick. Pipes 1-4 inches could also have "Colorado Standard" sets, but would use ½ inch insulation, and pipes larger than 4 inch could have "Colorado Standard" and be specified as 1 inch thick. Then in the Pipe Properties Window you can choose "Colorado Standard" insulation, and the appropriate thickness for the size you have chosen would be used.
Finally, among multiple insulation data sets you can specify a default data set.
Pipe Thermophysical Properties
The Edit Pipe Materials panel allows you to define thermophysical properties for the pipe. The density of the pipe can be entered as a constant, and the thermal conductivity as a function of temperature. The thermal conductivity is used in heat transfer calculations for pipes.
To add thermophysical properties select a Pipe Material to associate the data set with, then click Specify Properties from the Pipe Thermophysical Properties tab on the right. The Pipe Physical Properties window will be shown where the thermal conductivity data can be entered on the Pipe Material Property Data tab, and the density can be entered on the Density Data tab. A density calculator is provided to calculate the density using the pipe weight and dimensions.
Related Topics
Related Blogs
Databases 101 - Get to Know Them
Databases 201 - Name That Fluids


