Pipe Material Library
The Edit Pipe Materials panel can be opened directly from the Library menu, or by selecting it in the Library Manager. This panel is used to add custom pipe materials, sizes, and types to your user library or custom libraries. Once a custom pipe material is added, it can be easily selected in the Pipe Properties window, minimizing the data entry required by the user and allowing you to re-use the data in different model files. Pipe materials typically have a range of nominal sizes and a specific type, class, or schedule that describes the actual dimension.
Pipe Material Library Tree
The list of pipe materials, sizes, and types is shown in an expandable tree. The top level represents the different materials like Steel vs HDPE. Under each material there can be multiple nominal sizes like 1 inch vs 2 inch. Finally, under each size there can be multiple types, which represent classes or schedules that affect the internal diameter and wall thickness.

Figure 1: Example of the pipe material library tree
Many standard materials and sizes are already added to the AFT Internal Library. These items are read-only and cannot be modified. They are distinguished with a blue highlight. References for these materials are listed on the Pipe Material Library References topic.
Adding a New Pipe Material to the Library
At the very top of the tree, select the header that says Pipe Materials. Underneath the tree list, there are two buttons: New Material, and Import From File. For manual entry, click New Material. The Import From File option can be used to import data if it is specified in a certain format, and a dialog box will appear explaining the necessary import file format.
When adding a new material, you will be required to specify at least one nominal size and one type. The name descriptors you choose for the material, size, and type are at your discretion. They can contain text mixed with relevant numbers if you desire.
-
Library: Select the library you want to save the pipe material to. By default, the LOCAL USER LIBRARY will be selected, but this can be changed to any available external library that is connected via the Library Manager. If a custom library is not shown in the list, then it is either not added to the Library Manager, or not enabled for use with the check box in the Library Manager. Pipe materials can be moved or copied to a different library at a later time from the Library Manager. Note that you cannot have two pipe materials with the same name from two different libraries active at the same time (relevant if you copy to another library).
-
Material Name: Enter your custom material name that will display in the tree, like "Custom Carbon Steel".
-
Nominal Size: This is a text field that provides a name for the nominal size, like "2 inch".
-
Material Type: This is a text field that provides a name for the type, class, or schedule, like "Schedule 40 (STD)".
-
Geometry: This will affect the required input data fields. Options for non-cylindrical pipes are available.
-
Wall Thickness: This field is optional since the inner diameter is what affects the most basic flow calculations. Wall thickness is used for heat transfer.
-
Friction Model: Various friction models are available. See the Friction Data Sets section below for more details.

Figure 2: Example of adding a pipe material
Adding New Sizes or Types to an Existing Library Material
To add a new nominal size to an existing material, select the parent material (i.e. "Custom Carbon Steel" etc) and click New Size from below the tree.
To add a new type to an existing material, select the parent size (i.e. "2 inch" etc) and click New Type from below the tree.
You can also add multiple Friction Data Sets for each pipe material. Friction Data Sets are pipe friction values for a particular pipe condition. This allows you to keep, for example, different friction values that may apply to the same pipe under different conditions. These conditions could be related to the age of the pipe or the type of fluid being carried.
To create a new Friction Data Set select a Pipe Material, Size, or Type to associate the data set with, then click New Data Set from the Friction Data Set tab on the right (Figure 3). Modify the Friction Data Set description to provide a name, then enter the Friction Model and Value.
A Friction Data Set can be associated with the entire pipe material, or with specific sizes or types. For instance, a friction data set associated with Steel (i.e., the top level) might be called "25 year usage" and have a roughness value of 0.005 inches. This data set is then available to all sizes and types of steel. However, if "25 year usage" is associated only with the 1 inch Size of steel, it will apply only to the pipe schedules that are 1 inch.
You can also associate friction data sets with a specific type (i.e., schedule). For instance, you can make a "25 year usage" and associate it only with 1 inch schedule 40 Steel pipe and assign its roughness value as 0.006 inches. Then all Steel pipe would use 0.005 inches for "25 year usage" friction while the different value for 1 inch schedule 40 of 0.006 inches would supersede the value of 0.005 inches associated with all Steel pipe.
Finally, among multiple friction data sets you can specify a default data set.
Multiple friction data sets can be created for each type of pipe material. For example, there may be separate friction data sets for Steel pipe such as: New Pipe, 10 Year Use, 20 Year Use and 30 Year Use. Typically, the older pipes will have higher friction.
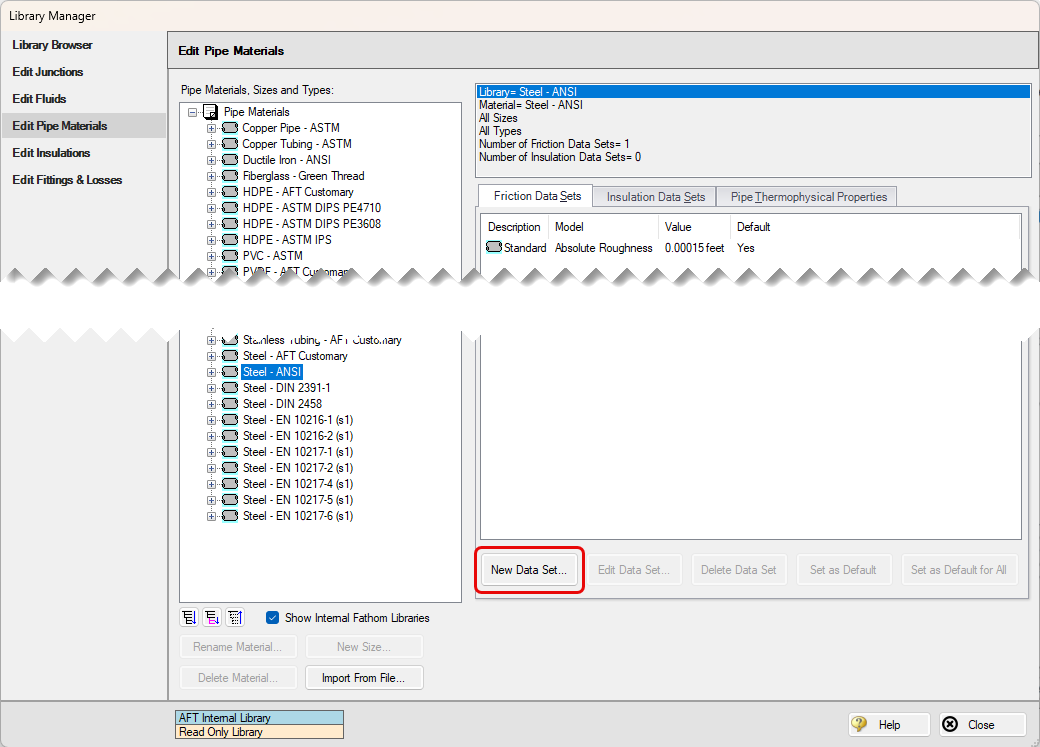
Figure 3: Friction Data Set tab on the Edit Pipe Materials panel
Pipe Physical Properties
The Pipe Material Library window allows you to assign physical properties of the pipe. The density and Poisson ratio of the pipe can be entered as constants, and the modulus of elasticity as a function of temperature.