Modules Panel
The Modules panel allows users to activate and enable the optional add-on modules.
Activating a module checks out a license seat for the module.
Enabling a module turns on all functionality for the module. By default activating a module will also automatically enable the module for use. Disabling a module keeps the license seat checked out but the module calculations are not applied to the model. Disabling a module may be desired for various reasons, as is discussed further for each module below.
Note: A module specific license is required to activate the GSC, SSL, XTS, or ANS add-on modules.
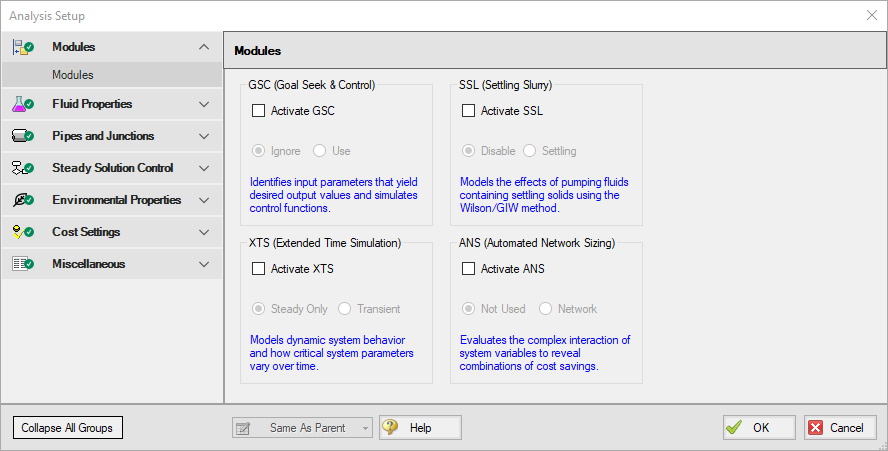
Figure 1: The default state of the Modules panel
Activate the Goal Seek & Control module by checking the box next to Activate GSC. Once activated, enable it by selecting Use or disable it by selecting Ignore. When the GSC module is activated, the Goal Seek and Control Group appears in the Analysis Setup window. The Goal Seek and Control group has three items: Variables, Goals, and Numerical Controls.
The GSC module can be enabled before or after a model is built. Pre-existing models built with the base AFT Fathom application can have the GSC module activated.
Setting the GSC module to Ignore causes the GSC module to function like the base AFT Fathom application. One difference is that users are still able to enter goal seeking data with this data retained in the model. If the model is opened in the base AFT Fathom application, this data will be lost. Table 1 relates the differences between using AFT Fathom without the GSC module activated, using it with the GSC module activated but disabled (Ignore mode), and using it with the GSC module activated and enabled.
The GSC module can also be toggled between Use and Ignore from the Analysis menu in the Goal Seek & Control option as shown in Figure 2. Use this feature to quickly toggle the GSC module between Use and Ignore without opening the Modules panel in Analysis Setup.
Table 1: AFT Fathom feature accessibility based on the GSC module activation and enablement
| Features | GSC Not Activated | GSC Activated | |
|---|---|---|---|
| GSC Disabled | GSC Enabled | ||
| Goal Seek and Control Group in Analysis Setup | Not Visible | Visible | Visible |
| Goal Seek and Control in Analysis menu | Not Visible | Visible | Visible |
| Goal Seek and Control tab in General Section of Model Data window | Not Visible | Visible | Visible |
| GSC Variables and GSC Goals tabs in General Section of Output window | Not Visible | Not Visible | Visible |
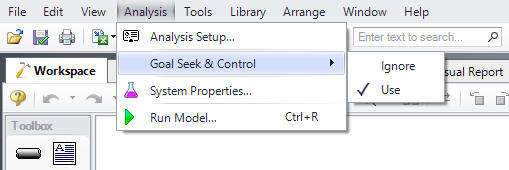
Figure 2: Select Use from the Goal Seek & Control option in the Analysis menu to perform goal seeking when running the model
SSL (Settling Slurry)
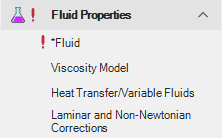
Activate the Settling Slurry module by checking the box next to Activate SSL. Once activated, enable it by selecting Settling or disable it by selecting Disable. When the SSL module is activated, the four standard items in the Fluid Properties group are replaced with the three SSL module fluid properties items as shown in Table 2 below. These items are Carrier Fluid, Solids Definition, and Slurry Definition. Additionally, the Library menu will have a Solids Library option. These items are present while SSL is activated and enabled, but will be switched back if SSL is disabled.
Table 2: Analysis Setup items in Fluid Properties group with and without SSL active
| Without SSL Active | With SSL Active |
|---|---|
|
|
Activating the SSL module can be done before or after a model is built. If activated after, then additional input will be required for solids data. Pre-existing models built with standard AFT Fathom can be opened with SSL and settling slurry data added.
Settling slurry calculations can be turned off at any time by selecting Disable. The Disable mode causes the SSL module to function like standard AFT Fathom. If a model with SSL activated is opened in standard AFT Fathom without SSL activated, then the SSL data will be lost once the model is saved. Table 3 relates the differences between not using SSL and using it in Disable mode. The purpose of Disable mode is that it allows standard clear fluid calculations to be performed without deactivating SSL. Deactivating the SSL module will cause the loss of the slurry input data for the active scenario.
The SSL module can also be toggled between Settling and Disable from the Analysis menu in the Slurry option as shown in Figure 3. Use this feature to quickly toggle the SSL module between Settling and Disable without opening the Modules panel in Analysis Setup.
Table 3: AFT Fathom feature accessibility based on the SSL module activation and enablement
| Features | SSL Not Activated | SSL Activated | |
|---|---|---|---|
| SSL Disabled | SSL Enabled | ||
| SSL items in Fluid Properties group | Not Visible | Not Visible | Visible |
| Slurry in Analysis menu | Not Visible | Visible | Visible |
| Solids Library in Library menu | Not Visible | Visible | Visible |
| Flowrate specified in terms of slurry, solids or clear liquid in several junctions | Not Visible | Not Visible | Visible |
| Slurry data in Output | Not Visible | Not Visible | Visible |
| Initial Velocity Guess Ratio V/Vsm in Advanced Parameters panel | Not Visible | Not Visible | Visible |
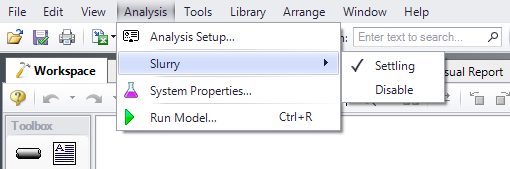
Figure 3: Select Settling from the Slurry option in the Analysis menu to perform settling slurry calculations when running the model
XTS (Extended Time Simulation)
Activate the Extended Time Simulation module by checking the box next to Activate XTS. Once activated, enable it by selecting Transient or disable it by selecting Steady Only. When the XTS module is activated, the Transient Control group appears in the Analysis Setup. The Transient Control group has one item: Simulation Duration.
Activating the XTS module can be done before or after a model is built. If activated after, then additional input will be required for transient junctions. Pre-existing models built with the base AFT Fathom application can have the XTS module activated.
Transient modeling can be turned off at any time by selecting Steady Only. The Steady Only mode causes the XTS module to function like standard steady-state AFT Fathom. One difference is that users can still enter transient data and this data is retained in the model. If the model is opened in standard AFT Fathom, this data will be lost. Additionally, the Transient Control group and Simulation Duration panel are still accessible. Table 4 relates the differences between not using XTS and using it in Steady Only mode.
The XTS module can be toggled between Steady Only and Transient from the Analysis menu in the Time Simulation option as shown in Figure 4. Use this feature to quickly toggle the XTS module between Steady Only and Transient without opening the Modules panel in Analysis Setup.
Table 4: AFT Fathom feature accessibility based on the XTS module activation and enablement
| Features | XTS Not Activated | XTS Activated | |
|---|---|---|---|
| XTS Disabled | XTS Enabled | ||
| Transient Control Group in Analysis Setup | Not Visible | Visible | Visible |
| Time Simulation in Analysis Menu | Not Visible | Visible | Visible |
| Transient tab in junction properties windows | Not Visible | Visible | Visible |
| Transient Pipe and Jct tabs in Output | Not Visible | Not Visible | Visible |
| Transient tab in junction section of Model Data | Not Visible | Visible | Visible |
| Time control slider and buttons in Output | Not Visible | Not Visible | Visible |
| Time control slider and buttons in Visual Report | Not Visible | Not Visible | Visible |
| Transient tab on Select Graph Data | Not Visible | Not Visible | Visible |
| Animation controls in Graph Results | Not Visible | Not Visible | Visible |
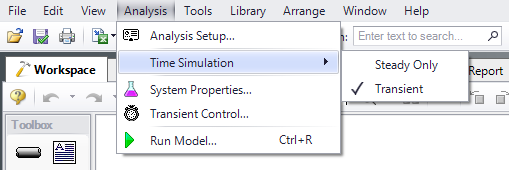
Figure 4: Transient mode is enabled from the Analysis menu
ANS (Automated Network Sizing)
Activate the Automated Network Sizing module by checking the box next to Activate ANS. Once activated, enable it by selecting Network or disable it by selecting Not Used. When the ANS module is activated, the Automatic Sizing group appears in the Analysis Setup. The Automatic Sizing group has one item: Sizing Summary. Additionally, the Sizing Window becomes available when ANS is activated.
Activating the ANS module can be done before or after a model is built. If activated after, then additional sizing data will be required to run the model. Pre-existing models built with the base AFT Fathom application can have the ANS module activated.
ANS can be disabled at any time by selecting Not Used from the same menu. The Not Used mode causes the ANS module to function like the base AFT Fathom application. However, all ANS data and settings in the model will still be retained. If the model is opened in the base AFT Fathom application, this data will be lost. The purpose of Not Used mode is that it allows ANS to be quickly turned off and on without having to change data in the Sizing Objective.
The ANS module can be toggled between Network and Not Used from the Analysis menu in the Automated Sizing option as shown in Figure 5. Use this feature to quickly toggle the ANS module between Network and Not Used without opening the Modules panel in Analysis Setup.
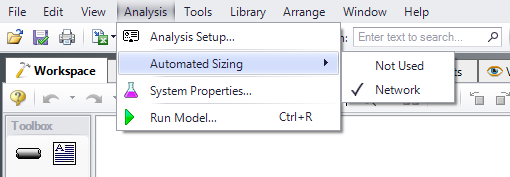
Figure 5: Enabling Automated Sizing from the Analysis menu


