Exporting to Excel
AFT Arrow includes a powerful ability to export any Output data to any specific cell(s) in an Excel spreadsheet. Specific values from the model can be exported, as well as columns, rows, or entire output tables as defined in Output Control. These items are controlled with the Excel Export Manager, available from the File menu.
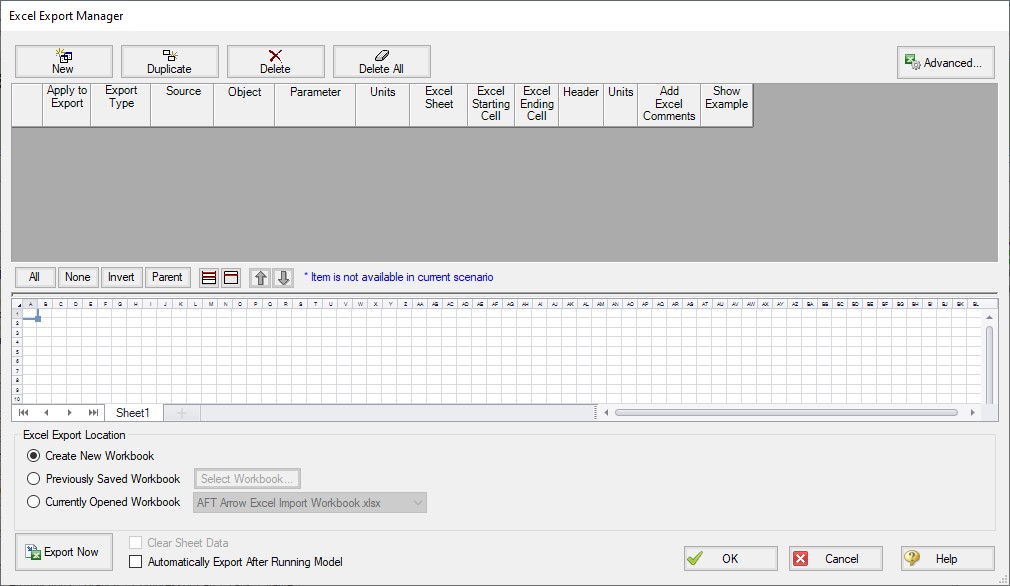
Figure 1: The Excel Export Manager
Adding Items to the Excel Export Manager
Data from the Output can be added to the Excel Export by clicking New, or by selecting an existing item and clicking Duplicate. Items can also be created directly from the Output Window by right-clicking on a cell or header.

Figure 2: Adding items directly from the Output
Each row in the Excel Export Manager corresponds to a cell, column, row, or table of data to be added to the spreadsheet. Each column helps define what data will be transferred where. The grid below the entries shows a preview of where the data will be added to help prevent intersecting data by showing where there are overlapping regions. Note that graph items can vary in size and do not show a complete region here.
-
Apply to Export - Items can be optionally included or excluded from the export.
-
Export Type - What type of data is being exported. This affects other settings, and will affect how much room is required on the target Excel sheet.
-
Single Value - The value of a single parameter for a single pipe or junction object.
-
Column - Values of a single parameter for all of the displayed objects.
-
Row - Values of all displayed parameters for a single object.
-
Table - Values of all displayed parameters for all displayed objects.
-
Graph - The graph points from a specified Graph List Item.
-
Other - Additional information not available in a standard Output table, such as Fluid definition, Model Title, or Scenario Names.
-
-
Source - Where the data is coming from.
-
Pipe - From the Pipe section of the output.
-
Junction - From the Junction section of the output.
-
General Output Summary - From one of the available output Summary sections. For example, if there is a Compressor/Fan junction in the model, Compressor/Fan Summary is available.
-
Graph - From a specified Graph List Item.
-
-
Object - The object in particular that is desired. If Column or Table are selected for Export Type, this selection will be fixed to ALL.
-
Parameter - The parameter in particular that is desired. If Row, Table or Graph are selected for Export Type, this selection will be fixed to ALL.
-
Units - The units of the exported value. This is available only for Single Value and Column Export Types. Some parameters do not have units and this will display N/A.
-
Excel Sheet - Which Excel Sheet to export to. This value can be edited by the user - if it is desired to export to a named sheet this can be entered here.
-
Excel Starting Cell - The upper-left cell to export the data to.
-
Excel Ending Cell - The automatically calculated lower-right cell of the data, which depends on the Export Type, export options, and the number of parameters or objects in the model. It is important to recognize that the Excel Starting Cells can be defined in a way that data gets overwritten. The Ending Cell column is a handy reference to help avoid this.
-
Header - Optionally export the name of the Parameter(s) related to the item.
-
Units - Optionally export the name of the Unit(s) related to the item.
-
Add Excel Comments - Optionally adds an Excel comment to the value cell that contains the Parameter name and unit.
-
Show Example - Displays an example of how the exported cells will appear.
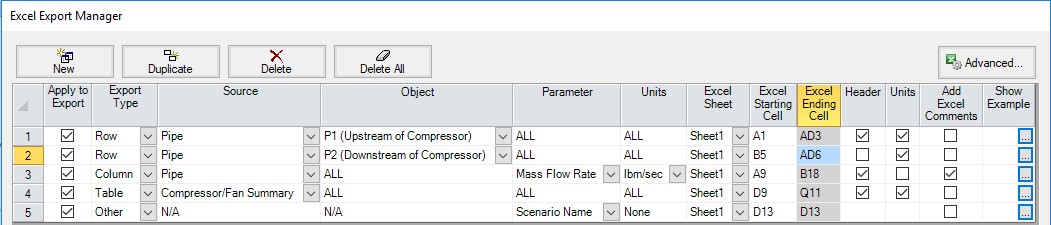
Figure 3: Example Export
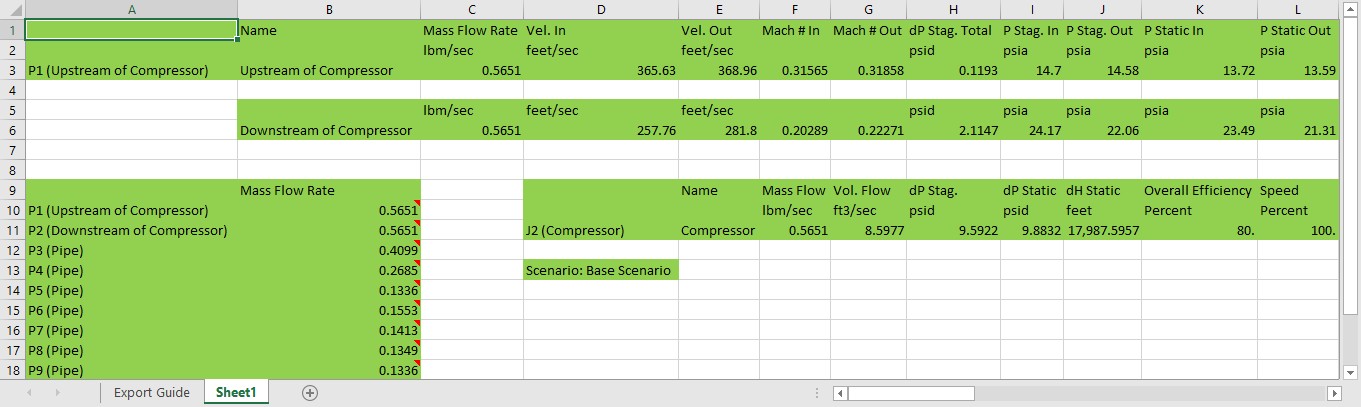
Figure 4: Result of the above example. Color added for emphasis.
Excel Export Location
After all of the desired data has been added to the Excel Export Manager, the next step is to actually export the data. There are three options available for the export:
-
Create New Workbook - A new Excel Workbook will be opened with the exported data.
-
Previously Saved Workbook - Browse to a Workbook saved to file. The Workbook will be opened and the modifications made to the sheets as specified.
-
Currently Opened Workbook - Select a Workbook that is currently open in Excel. The already open Workbook will be modified.
Note: The Excel Export Manager does not save Excel files for non-batch run exports. Any changes made need to be manually saved by the user in Excel.
There are two options available for exporting:
-
Clear Sheet Data - All of the existing data on the sheets specified in the Excel Sheet column will be cleared. This is especially useful for setting up a new export when many changes are being made.
-
Automatically Export After Running Model - After the model is run, the Export will be carried out automatically, per the settings defined by the user in the Excel Export Manager.
Advanced Options
Items can be added directly from the Output instead of adding custom items with the New button. There are two behavioral options that can be modified for this action:
-
Open Excel Export Manager - If enabled, the Excel Export Manager will be opened every time an item is added from the Output. This is useful for double checking the setup.
-
For Existing Items -
-
Add New Item - The item selected will be added to the Excel Export Manager even if it already exists.
-
Select Existing - If the item already exists, do not add a duplicate item and instead select the existing item.
-
Ask - If the item already exists, prompt the user on the action to take.
-
-
Create an Export Guide - When exporting, an Export Guide can optionally be included in the export. The Export Guide contains information about the model and the generation of the export, to help keep the connection between the data and the model clear for future reference.
Exporting Data From Multiple Scenarios
The Excel Export Manager can be employed with Batch Runs with a couple of important distinctions.
First, if multiple sheets are specified in the Excel Export Manager, the only way to export multiple scenarios is to export every scenario to its own Workbook. To keep data from multiple scenarios in one Workbook, there can only be one sheet specified in the Excel Export Manager.
Second, the Excel File will be saved after each scenario. In normal single-scenario exports the file is never saved, but in batch mode it is required.
In the Batch Run tool, users are also able to use Excel Export without having to run the scenarios again. Note that if any of the scenarios in the Batch Run do not have output, the batch Export Only will not export any data for that scenario, as it will not run those scenarios to get output.
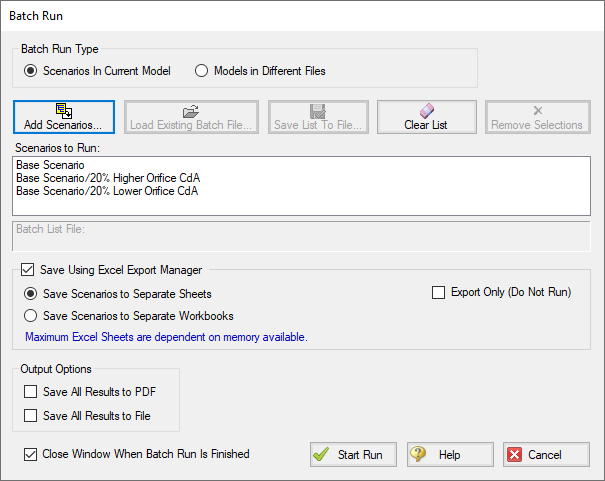
Figure 5: Saving Results From Multiple Scenarios
Related Topics
Critical Warnings, Warnings, and Cautions
Importing Piping Component Files
Importing CAESAR II Neutral Files
Importing and Exporting EPANET Files
Related Blogs
Paint a Clear Picture Faster Than Ever with AFT's New Excel Export Manager